
While it’s true that the best saws in the world are only as good as the blades they spin, that’s just part of success. The other part depends on your skills managing your tools, using them, and keeping consumables such as blades stocked and on hand before you need to replace them. Here are details that I’ve found helpful:
Match the Blade & Work
Crosscutting and ripping solid wood is a different job than cutting veneered sheet goods. Sawing melamine is different than trimming particleboard. Crosscutting crown moulding is different than sawing 2×6 wall studs. This is why a complete set of traditional tablesaw blades should include a coarse ripping blade for sawing solid wood to length, a fine-tooth blade for crosscutting, a melamine blade for chip-free cuts in factory-finished sheet goods, and a combination blade for rough, general-purpose work.
Match the Blade & Machine
Today’s move towards smaller, lighter tablesaws and chopsaws make it easier to carry tools wherever the work is, but reduced cutting power is usually part of the price you pay for portability. If you have a lightweight chopsaw or portable benchtop tablesaw, you can make the most of their smaller motors by using “thin-kerf” saw blades. Kerf refers to the swath of wood removed by the blade, and thin-kerf models chew through about 30% less wood than full-kerf blades with each pass, delivering that much more cutting power to your work. The Premier Fusion blade is available in both full- and thin-kerf configurations, and is one of the few thin kerf models that includes polymer-filled, anti-vibration slots to keep the blade running true and wobble-free. I’ve had great results with this blade.
Align the Blade & Fence
When it comes to tablesaw performance, nothing matters more than the relationship between your saw’s fence and blade. The blade and fence must be parallel for smooth cutting to happen, and the best way to check is by switching off your saw part way through a fence-guided cut. Let the blade spin to a halt, disconnect the power, then take a close look at how the blade sits in relation to the wood. If the cutting groove isn’t evenly straddling the blade, adjust the angle of the fence relative to the blade to make this happen reliably and automatically every time the fence is locked. Ideally, teeth are the only part of the blade that should touch the wood.
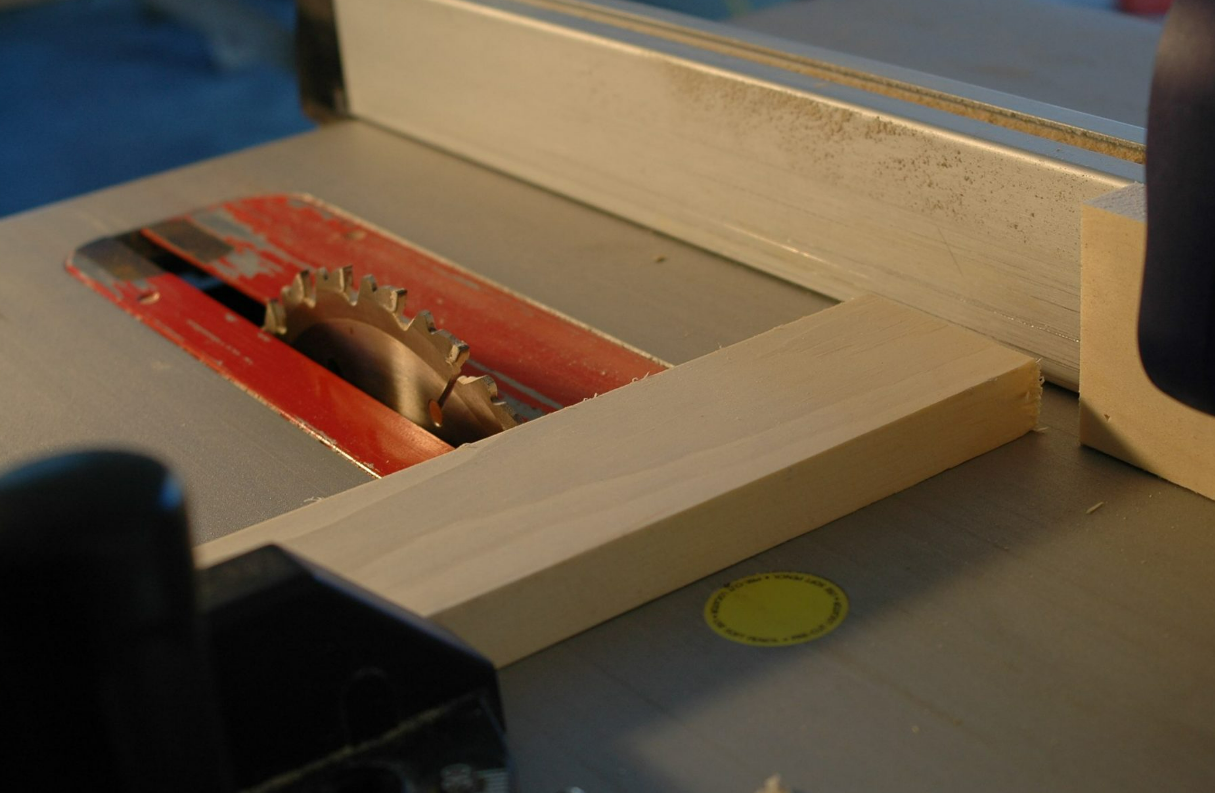
Crosscut With Stop Block
Will you be doing multiple crosscuts of the same length? You might be tempted to use the fence as a stop to reproduce cuts perfectly, but there’s a hidden danger. Always make sure the end of your workpiece is free and clear of contact with the rip fence or any other object when crosscutting with a mitre gauge on the table saw. Ignore this precaution and you’re certain to experience kickback. If you need to make repeated cuts of the same length, clamp a block of wood to the end of the fence closest to you, as a stop block, so the workpiece is clear of this block by the time you slide it forward using the mitre gauge to encounter the blade. The image below shows the use of a stop block clamped to the fence to create the all-important space between the end of the work piece and the fence. Without this space there’s an excellent chance (actually, almost guaranteed) the wood will get trapped between the fence and the blade, kicking the wood back at you in an explosive way.
Post time: Jun-24-2022